Saturday, December 24, 2011

Christmas Countdown - Santa Cookies

1 day until Christmas . . .

Okay guys! The time is here! This is Santa's big night. Do you have your carrots and celery ready for the reindeer? Did you refrigerate yesterday's cookies to bake today for Santa? And of course you have something for the elves, right? You don't?  Why not? They built your gifts, they wrapped them, and they packaged the sleigh.  Don't forget to leave that out tonight! ;-)


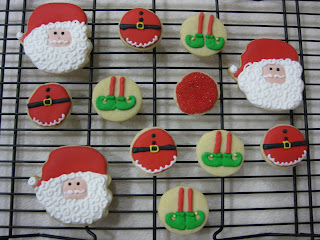
I don't have a recipe for today so you can bake yesterday's cookies.  I decided to just bake and decorate Santa related cookies! I have some Santas, Santa belts, a sparkly Rudolph nose, and (NEW) elf shoes. I think the little button, bite-sized cookies are my favorites. Wouldn't a jar, can, or bag full of sparkly red cookies be cute?!


I hope you all have a wonderful and relaxing Christmas and safe travels if you are going out of town! 
 Merry Christmas!!

Friday, December 23, 2011

Christmas Countdown - Peppermint Chocolate Chip Cookies

2 days until Christmas . . .


Only two days left. Wow, I really hope you are finished with your shopping and now you are just enjoying a steamy cup of hot cocoa and watching Christmas movies.


These cookies are what I imagine Santa would love. They have chocolate and peppermint. I bet you saw that one coming, huh? I'm not surprised! These are terrific and one of my favorite cookies! If you leave a plate of these out, they will be gone quickly, so be sure to save a few for Santa!

Peppermint Chocolate Chip Cookies - David Lebovitz
INGREDIENTS:
2 1/2 cups all-purpose four
3/4 tsp. baking soda
1/8 tsp. salt
1 cup unsalted butter
1 cup packed light brown sugar
3/4 cup granulated sugar
1 tsp. vanilla extract
2 large eggs at room temperature
7 oz milk chocolate chips
7 oz Andes Peppermint Crunch Chips

DIRECTIONS:
Preheat oven to 350*. In a small bowl, whisk together the flour, baking soda, and salt; set aside. In a stand mixer combine butter, brown sugar, sugar, and vanilla in a bowl on medium until smooth. Beat in the eggs one at a time until incorporated. Stir in the flour mixture and the chocolate and peppermint chips. Roll this out into a log and wrap and refrigerate for 24 hours. (This needs to be done). Slice the log into 3/4" slices and places on cookie sheet. Bake for 10 minutes, at 5 minutes turn the cookies sheet around in the oven. Weird I know, but that's what the directions say and I did it. Let the cookies cool on the cookie sheet! (These cookies actually spread quite a bit - even being put into the oven on the colder side.  I recommend dividing this into fourths and rolling it into a log about an inch high).  I have HUGE 4" cookies!  

Tomorrow is my last post, I hope you will miss them like I will. See you tomorrow!

Thursday, December 22, 2011

Christmas Countdown - S'mores

3 days until Christmas . . .

This is a fun treat that can also be given as little gifts throughout the year. Halloween with ghosts or pumpkins, Easter with bunnies or chicks, or Christmas with trees and snowmen. If you want to make these into stocking stuffers you need to indivually bag or package these and tie them up with a cute ribbon. Quick. Simple. Fun.


I wrote these posts before December so at the time when I made these the Hershey bars were just that - Hershey bars.  Now that Christmas candy is out they have the individually wrapped Santa Hershey bars - I would use those for your baggies!  =D  


Christmas S'mores
INGREDIENTS:
Marshmallow Peep 
1 Graham Cracker
Hershey Chocolate Bar

DIRECTIONS: Arrange the s'more with a graham cracker and some chocolate . Put this stack on a plate and microwave for 25 seconds. Now add the marshmallow and microwave for 5 seconds. Do not take your eyes off of this, that marshmallow expands and will explode (or that's what I think will happen)!  Press on the last graham cracker and voila- a s'more. 

Tomorrow I will give you the recipe that I think Santa would love for you to leave out for him on Christmas Eve (and it's delicious too)!!

Wednesday, December 21, 2011

Christmas Countdown - Red Velvet Whoopie Pies

4 days until Christmas . . .


Wow, we are wrapping up the countdown. I hope everyone has all their Christmas shopping complete and all the presents are snuggled safely under the tree. If not, you have FOUR days to get it done!

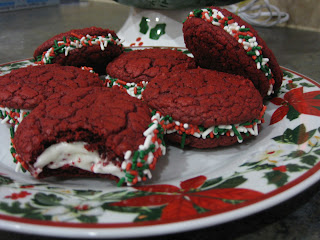
Today, we are making WHOOPie pies! (anybody get it?) You can make chocolate or vanilla and dye them any color you want, but today we will be making Red Velvet whoopie pies. (these are also great for Valentine's Day - fyi). These can be decorated different ways as well, once you fill the cookies roll the pie in sprinkles and they are Christmasy!!


The recipe today will be using a cake mix to allow you the opportunity to make any flavor whooppie pie you want and because I know you are busy and the box makes it easier. It's okay to use cake mixes, they were made to make things easier for you! I always have a few boxes ready to go - just in case!


Red Velvet Whoopie Pies
INGREDIENTS: 
Cookies: - Makes about 36
1 Box cake mix
1/2 Cup butter
2 Eggs


Cream Cheese Filling:
8 oz cream cheese
1/2 cup butter
1 lb (approx 4 cups) powdered sugar
1 tsp vanilla

DIRECTIONS:
Cookies: Preheat oven to 350°F. Line cookie sheets with parchment paper (you don't have to, it just makes clean up a breeze). Mix all 3 ingredients in mixer until well combined. This will be a little sticky, that's okay. Drop spoonfuls of cookie batter onto your prepared baking sheet about two inches apart. Bake for 10-12 minutes (my oven was 8 minutes!). Let cool COMPLETELY!


Filling: In a mixer, cream the butter, cream cheese, and vanilla.  Gradually powdered sugar and mix until smooth.  Dye any color you choose.  


Spread or pipe the filling in between the cookies. Leave some room on the edge to allow for spreading when you press the cookies together.  I usually let them sit for 10 minutes or so to let the frosting set.

Tomorrow I will show you a quick stocking stuffer that everyone will enjoy eating.

Tuesday, December 20, 2011

Christmas Countdown - Ice Cream Cone Cannoli


5 days until Christmas . . .

This is a slow day. Not too messy, not a big clean up.  I have never had these, but I came across it here and thought I would give it a try.  I wanted to decorate my cone so I dipped it into melted chocolate and then dipped the cone into jimmies.  It gave them more of a festive look! 


I definitely recommend only filling the ice cream cones right before they are ready to be served because they will get soggy!  Let me know what you think!  Enjoy!  


Ice Cream Cone Cannoli

INGREDIENTS: 
15 oz Part-Skim Ricotta Cheese
1/2 cup powdered sugar
1/2 teaspoon vanilla
1/4 teaspoons orange rind (i didn't put this in mine)
1/4 cup mini chocolate chips

8-10 sugar ice cream cones

DIRECTIONS:
With a wooden spoon mix ricotta, powdered sugar, (orange rind,) and vanilla until smooth.  Add the chips and stir until evenly blended.  Cover and refrigerate for an hour.  Spoon mixture into ice cream cone.   Keep mixture into fridge until you are ready to use it! 


I would definitely stop by tomorrow if I were you because everyone loves tomorrow's treat! You just can't stand not knowing, huh? ;-)

Monday, December 19, 2011

Christmas Countdown - Candy Cane Pretzel Bites


6 days until Christmas . . .

I have made a recipe similar to this one, but last time I used rolos. These are super quick and very yummy - again with the mint!! I made a few different types because I wasn't sure if nuts would go well with peppermint. Turns out they don't! Not for me anyway! So, adorn your pretzel and mint Hershey kiss with upside down M&Ms or another pretzel! I preferred a pretzel, Hershey kiss sandwich.  


Candy Cane Pretzel Bites
INGREDIENTS:
Mini Pretzels
Candy Cane Hershey Kisses
M&Ms

DIRECTIONS:
Pre-heat the over to 250*. Line all the pretzels on a cookie sheet with parchments paper. Top each one with a kiss. Bake for 2 minutes. Stand there and watch them, if they begin to lose their shape they are too done and you should decrease baking time for the next batch. Now, press down the pretzel or M&M and let them cool, or stick them in the freezer for 10 minutes to speed up the process. 

Tomorrow is an Italian Christmas Dessert!

Sunday, December 18, 2011

Christmas Countdown - Ginger Snaps


7 days until Christmas . . .

As a child, Sister and I would always help our mom decorate Christmas cookies. We had butter cookies, sugar cookies, press cookies, pecan balls, white chocolate covered pretzels, and my favorite - Ginger Snaps. This recipe is from Great Grandma and I hope you treat it with care and enjoy it as much as I do! I continue the tradition of making some (not all, there are only two of us) of the cookies and I hand them out as gifts or let Husband take them to work with him.

Below are the ingredients and the directions on how to make and decorate this cookie. Again, be creative. I roll the cookie ball in a bowl of sprinkles to completely cover it, then use a buttered glass to gently press down each cookie. Bake. Serve. Eat!  


I happen to come across some red crystal sprinkles that had edible gold glitter in the bottle. I was all over that!!  On the close pic up you can actually see that the red cookies are sparkly!  


Ginger Snaps
INGREDIENTS:
1 cup Sugar
2 cups Sifted All-Purpose Flour
3/4 cup Softened Butter
2 teaspoons baking 
soda 
1 teaspoon cinnamon
1 teaspoon cloves
1 teaspoon ginger
1/4 cup molasses
1 egg
1/2 tablespoon salt


DIRECTIONS:
Preheat oven to 350*.  Sift together the flour, baking soda, ginger, cloves and cinnamon. Set aside.  Cream butter, sugar, egg and molasses until well combined.  Add flour mixture and beat until smooth.  Mixture will be very stuff.  Roll 1.5 inch balls and place on baking sheet, slightly flatten them. Bake for 8 minutes.  

Tomorrow's a fun day with a quick and easy Christmas treat for you to take to one of your many Ugly Sweater Christmas Parties, White Elephant Parties, or just family and friendly gatherings.

Saturday, December 17, 2011

Christmas Countdown - Mint Chocolate Cupcakes

8 days until Christmas . . .

The countdown is still going, I hope you are just as excited as I am to see what's next. I love mint and I love chocolate and mint and I love Christmastime and mint. So, you might see another recipe with mint again! =D

I have made these before, but didn't blog about them. They are fantastic and are usually a hit with everyone.  

You can decorate them how ever you would like. Last time I dyed the frosting green. This time, I made them red. I decorated them two different ways: as peppermint swirls and as Santa hats! Use your imagination and have fun!


Mint Cupcakes
INGREDIENTS:
Cupcakes: - Makes about 24
2 cups sugar
1-3/4 cups all-purpose flour
3/4 cup Cocoa Powder
1-1/2 teaspoons baking powder
1-1/2 teaspoons baking soda
1 teaspoon salt
2 eggs
1 cup milk
1/2 cup vegetable oil
2 teaspoons vanilla extract
1 cup boiling water


Chocolate Mint Filling:
1/2 cup chocolate chips
3 tablespoons heavy cream
1 teaspoon peppermint extract
1/3 cup powdered sugar


Mint Buttercream:
1 cup (2 sticks, 16 tablespoons) butter, softened to room temperature
8 ounces cream cheese, softened to room temperature
Approx 7 cups powdered sugar
1/2 cup heavy cream
1 teaspoons pure vanilla extract
2 teaspoons peppermint extract

DIRECTIONS:
Cupcakes: Preheat oven to 350°F. Line muffin cups with paper baking cups. In a large bowl, stir together sugar, flour, cocoa, baking powder, baking soda and salt. Add eggs, milk, oil and vanilla; beat on medium speed for 2 minutes. Stir in boiling water. (don't worry! the batter will be on the thinner side). Fill the muffin cups 2/3 full and bake for 18-20 minutes, until a toothpick inserted in the center comes out clean. Let the cupcakes cool completely on a wire rack, after removing them from the muffin tin.

Chocolate Mint Filling: While the cupcakes are baking, place the chocolate chips and heavy cream in a small microwave-safe bowl and heat for 1 minute. Stir. Repeat the process in 30 sec increments until the mixture is smooth. (Be careful not to overheat as the chocolate can then seize). Stir in the peppermint extract and powdered sugar, stirring until smooth. Let the mixture cool to room temperature (but don’t let it get too stiff). Put into a ziplock bag (or pastry bag if you have one) and cut off the tip.
When the cupcakes are cool, insert the tip of the bag into the center of the cupcake and press gently to fill the middle of the cupcake with the mint ganache. (It's easier if you cut a hole or slice the cupcakes open first).
Mint Buttercream: In a large bowl, beat the cream cheese and butter until light and fluffy. Add the powdered sugar.  Slowly add the heavy cream and peppermint and vanilla extracts. Beat until light and fluffy , usually about 2 minutes. 
Frost the cooled, filled cupcakes. You can garnish with an unwrapped Andes mint, chocolate sprinkles, broken Andes peppermint pieces or anything else you can think of! Refrigerate until serving.
Get ready for swarms of people asking you for this recipe! Stay tuned tomorrow for my favorite Christmas cookie of-all-time.

Friday, December 16, 2011

Christmas Countdown - Spiral Sugar Cookies

9 days until Christmas . . .

Today, I will show you how to make spiral cookies! These can also be made for different 
holidays!


Go bake your favorite sugar cookie recipe. Divide the dough into two sections. I dyed half of it red 
and left the other half plain. You can do whichever you choose, red and green, white and red,
white and green. You get the idea?

Now, there are different ways to do this, I will tell you what works for me and I hope this works for
you. Roll out one of the colors to a size of about 9x13 at 1/4" thick. Roll out the other the same way.
Lightly wet the first one - I mean lightly, just enough so it will stick. Place one on top of the other.
Start at one of the long (or 13") sides and begin rolling. Here you can roll your dough in sprinkles or leave it plain - the decision is yours and both will be delicious. I made both to give you an idea, but the sprinkles made it more difficult!

Put the dough in the fridge for at least 2 hours and up to 3 days. Preheat the oven to the temperature on your recipe. Slice the cookies about 3/4" thick and lay them out on the cookie sheet and bake as directed.

Simple, right? Enjoy! Tomorrow I have a DELICIOUS cupcake recipe for you!

Thursday, December 15, 2011

Christmas Countdown - Decorated Christmas Cookies

10 days until Christmas . . .

Happy Holidays everyone! I am going to do a daily post with pictures, recipes, or crafts to countdown to the final day - Christmas Day! I have had these ready to go since Thanksgiving so I am very excited to begin the countdown!

I don't know about you, but I LOVE Christmas. I love the cooler weather (hopefully - this is Texas,) the smell of fireplaces, the lit Christmas tree, the lights on the house, my holiday dishes, and oh - the cookies and sweets! It's a warmer, happier feeling than any other time of the year and I just can't get enough. I try and wait until the day after Thanksgiving before I start decorating (or writing Christmas blog posts,) but sometimes the wait is too much. This year the tree and house lights went up the Friday after Thanksgiving.

For today's post I baked and decorated some cookies.  The poinsettia cookie and one of the snowy Christmas trees are probably my favorite cookies in this batch!!  I hope everyone has a tree they put up, presents they put under it, and hopefully lights on the house and if you have snow - I am so jealous! 


Enjoy the cookies and only 10 days left until Christmas! Tomorrow I will show you how to make spiral Christmas cookies!