Wednesday, August 31, 2011

Birthday Cupcakes!

These cupcakes were made for my friend's birthday, vanilla cupcakes and chocolate cream cheese frosting!

Happy Birthday Magan!!

Monday, August 1, 2011

Train Cookies

I made these cookies for a friend who hosted a baby shower for a little boy! Isn't this design cute? I based the train on a napkin I was given!


Thursday, July 28, 2011

Cherries in the Snow

This recipe is one of my all-time favorite desserts! My mom always made this on Valentine's Day (why? i don't know) and I always looked forward to it. She even made me my own individual pies and brought them to College Station when I was in college. I needed a dessert for our neighbor dinner and this was the first thing that popped into my head. Enjoy!

Cherries in the Snow
Crust:
3 cups of crumbs
1 stick of butter
1/2 c sugar
Filling:
2-8oz of cream cheese (I used 1/3 less fat) (room temperature)
1-12 0z tub of cool whip (unfrozen)
1/2 c sugar
2 cans cherry pie filling

1. Crush graham crackers. Melt Butter. Add sugar to crackers and mix with butter.

2. Press mixture into a 9x13 pan. Bake at 350* for 10 minutes.


3. In a bowl combine cool whip, cream cheese, and sugar until creamy. Poor evenly onto crust.


4. Top with cherry filling. Chill, then serve!

Wednesday, July 27, 2011

They grow up so fast!

I cannot believe my little girl is TWO today! Where does the time go!? I remember when she was so little and fit perfectly in my arms, and now she's 57 pounds and I can barely hold her. Well, in honor of her 2nd birthday I will show you how to make her favorite snacks! She love, love, loves them and really gets a kick out of licking the peanut butter off the spoon when we are finished. Here's how to make her favorite peanut butter treats and banana ice cream cubes.

Homemade Peanut Butter Bites
1.5 cups flower
3/4 cup oatmeal
1/4 cup wheat germ
1/4 cup crunchy peanut butter
1/4 cup vegetable oil
1/4 cup honey
1 tsp baking powder
1/2 cup water
Directions: Preheat oven to 325*. Mix all ingredients until well combined. Form tablespoon sized balls and place on an un-greased cookie sheet (I personally make them more bite sized - the size of a quarter). Flatten balls to 1/4" (I use the bottom of a glass). Bake for 15-20 minutes.

Banana Ice Cream
2 cups vanilla or plain, low-fat yogurt
2 mashed bananas
2 tbls of honey
Directions: Put everything in a blender and combine. Put in an ice cube tray and freeze!
FYI: it is true that dairy products aren't good for your dogs, but yogurt contains much less lactate than regular milk and the live cultures are great for your dog's digestive system. - Thank you CTSPCA!

Oh, did I fail to mention my baby is a two year old, black and white, dog?! Oh yes, Aggie's a dog and she's my baby! ;-)

Aggie at 7 weeks old and 7 pounds!

Aggie today with her bone!

Happy Birthday Aggie!

Saturday, July 23, 2011

50th Birthday Cupcakes

My mom threw a 50th birthday party for one of her friend's at her house. She helped me make and decorate all the cupcakes! We made chocolate cupcakes with chocolate, cream cheese frosting, vanilla cupcakes with cream cheese frosting, and finally coconut cupcakes with cream cheese frosting! They were delicious! I just looove cream cheese frosting!


Happy Birthday Pam!!

Monday, July 18, 2011

Monogram Hearts & Rose Cookies

These cookies were made for a family friend who threw a bridal shower yesterday! I had a lot of fun making these, especially the rose cookies and I will definitely be making them again! Wouldn't they be cute in a variety of colors? =D


Monday, July 4, 2011

Happy Independence Day!

I spent today by the pool with friends and family, cooking out and enjoying everyone's company. I prepared a few desserts, a vanilla cake and chocolate cupcakes along with some white chocolate covered pretzels. I have a few more good ideas, but I guess those will have to wait until next year but be assured they will be red, white, and blue.

Here are my 4th of July treats:


I saw a cake similar to the one I made in a magazine back in May and I wanted to make it for Memorial Day, but time got away from me. I think it worked out much better for the 4th!


Happy 235th Birthday America!

Thursday, June 30, 2011

Oreo Brownies

I have been on the hunt for a good Oreo brownie recipe and I think this has been the first to pass the test. I have tried a couple in the past few months, but none of them made it to my blog, but this one is worth a try. You will not be disappointed!

Oreo Brownies
1 Box of Brownie Mix
1 package of Oreos (use reduced fat if you want to)
1 80z tub of cool whip (I used lite)
8oz of cream cheese (I used 1/3 less fat)
2 cups powdered sugar
1.5 cups semi-sweet chocolate
1 Tabl vegetable oil

Almost all of the ingredients! Do you like my mickey mouse measuring cups? I got them at Disney World! Love them!

1. Chop up all the oreos into groups of three. I cut them into fourths. I only used two rows of oreos, not all three.
2. Bake the brownies according the package directions. Let cool completely.
(Now, the directions actually say to fold in 1/3 of the oreos into the batter. I didn't do this because in the last batch of oreo brownies I made you couldn't even taste them. So, why the extra calories?!)

3. In your mixer combine the cream cheese and powdered sugar until combined. With a spatula gently stir in 1/3 of the chopped oreos and the cool whip. Spread on top of the brownies.
4. Now melt the chocolate chips and vegetable oil, either in a pan on the stove or the easy way, in a glass bowl in the microwave. When melted, spread evenly over the cream cheese. (Now, after having made these I would skip this step. The chocolate gets hard and it's messy and not easy to cut or serve, but that's just me).
5. Now sprinkle the remaining chopped Oreos evenly on top of the melted chocolate.

Refrigerate for at least 30 minutes or until ready to serve.
Recommendation: Cut these after they have been in the fridge for 10-15 minutes (before the chocolate has completely hardened).


Thursday, June 9, 2011

Ribbon Cake

This is a vanilla cake with three layers of fresh, homemade raspberry filling topped off with a delicious butter cream frosting! Husband's family came over for dinner and I made this cake for dessert. I was trying a new technique and I think it turned out great!! The color is a little deceiving, this is actually closer to a Tiffany's blue!


Monday, June 6, 2011

Funfetti Birthday Cake

I made this cake for my friend's birthday! She loves funfetti, so this is it!
Funfetti cake with butter cream frosting!


Friday, June 3, 2011

Graduation Cake

Class of 2011 Graduation Cake
Vanilla cake with a butter cream frosting and hand piped designs!


Thursday, June 2, 2011

Mini S'more Pies!

I was browsing the internet for a quick dessert for Neighbor Dinner and came across this blog and thought this sounded delicious! Oh, and it was!

Mini S'more Pies
6 Mini Graham Cracker Pie Crusts (Keebler Brand)
Marshmallow Fluff (Kraft)
2 Hershey's Chocolate Bars
Small Chocolate Pudding (not instant)
Mini Marshmallows
Mini Chocolate Chips for decoration (like this needs any more chocolate)

1. Take a spoonful (approx a tablespoon) of marshmallow fluff and put in each crust. (Warning: I tried to spread it, but it lifted the crust and broke, so take it from me and just drop it in).
2. Split the chocolate bar (I did about 3 pieces) and place on top of marshmallow fluff and press down firmly to spread out the marshmallow fluff.
3. Prepare your chocolate pudding and pour on top of chocolate bar, no need to let it cool.
4. Immediately pour mini marshmallows on top and then sprinkles with mini chocolate chips.
5. Right before you are ready to serve broil these for about a minute or two, or until the marshmallows are lightly toasted. Be careful, they burn quickly - don't take your eyes off of them!

Of course, I do not have a final picture. Are you beginning to see a pattern here?! =D

Enjoy! These little pies are yummy!

Wednesday, April 20, 2011

Vanilla Jello Cupcakes

These are heavenly! This is easily, one of my favorite desserts. I have normally found this recipe only with cakes, but I am a cupcake person and so I improvised. So here we go! Unfortunately, I was a little scattered-brained when I made these because I kept forgetting to take pictures and then never got a final picture. I am so sorry! You will have to use your imagination!

Vanilla Jello Cupcakes
1 3 oz box of (insert flavor here) Jello
1 cup boiling water
Favorite vanilla cake recipe or box mix
Tub of Cool Whip


1. Cook the cake or cupcakes per your directions. Let cool.
2. Take a fork and stab deep into the cupcakes, a few times in a few different places. In the picture you will see a stick, but a fork works much better!
3. Mix 1 cup of boiling water with Jello packet. Carefully spoon over each cupcake. WARNING: This step is a complete mess!! ( Now I see why people usually do cakes. ) I put my cupcakes on a cookie sheet with a lip to avoid further, yet inevitable, spillage.
4. Allow them to chill in the fridge over night. (Store in fridge when finished.)
5. Spread on the cool whip!
(When I make them again, which I am sure will be soon, I will post a picture from that batch).

Enjoy!

Tuesday, April 12, 2011

Flower Cookies

In Texas, our highways are littered with wild flowers and blue bonnets this time of year. I love it; it makes for a happier drive! Unfortunately, we do not have as many as last year and they seem to be fading quickly. My cousin asked me to make two dozen cookies for her, so I opted for a variety of flowers!


Monday, April 11, 2011

Easter Bunny Cookies

Last year I made personalized Easter egg cookies as personalized place setting for Easter dinner, that Husband and I hosted at our house. I wanted to try something new this year, so I decided to make my own cookie. I saw a picture I really liked, so I created a cookie fairly similar. No cookie cutters were used in this entire process and I think they turned out pretty well!

What are you planning on doing for Easter?

Friday, March 18, 2011

Green Cake

This is my chocolate cake (from previous post) with a bright green, vanilla inside with a hidden white shamrock!! Okay, so I was making a traditional St. Patrick's Day cake! ;-) I was taking a shot in the dark and it did work, so I was thrilled! I think it would have worked better, had the colors been switched! Next time, I will try that!


Wednesday, March 16, 2011

Chocolate Swirl Cake

I decorated the cake to look like it was enveloped in roses or flowers. Husband thinks it's a "cool swirl pattern," but not flowers! I made it for dessert for our St. Patrick's Day dinner (corned beef and cabbage, what else?!). I know, I know, it doesn't look like a traditional St. Patty's cake with coins billowing out of black cauldron or green frosting covered with green sprinkles and clovers or a silly little leprechaun, but I like it regardless!


Happy St. Patrick's Day!!

Sunday, March 13, 2011

Chocolate Mint Brownies

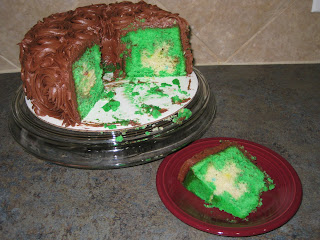
These are the brownies I made for dessert for our neighbor dinner Wednesday night, in honor of St. Patrick's day I chose to make them green. They take a little bit of time and dirty all the bowls in your house, but they are delicious!!

*Brownie Layer*
1/2 cup of unsalted butter, cut into pieces
4 ounces unsweetened chocolate, chopped
1 1/4 cups sugar
1 teaspoon vanilla
2 eggs
1/2 c all flour
1/4 teaspoon salt

*Mint Layer*
2 tablespoons unsalted butter
1 c powdered sugar (sifted)
1 tablespoon milk or heavy cream
1/2 teaspoon peppermint extract
green food coloring

*Chocolate Drizzle*
3 oz semisweet chocolate, chopped
1 tablespoon butter

1. Pre-heat oven to 325* and prepare a 9x9 or 8x8 pan by lining parchment paper across both sides of the pan. This is so the brownies can be lifted straight out of the pan and cut cleanly.
2. Brownie Layer: In a glass or steel bowl over a pan of simmering water (or double boiler), melt the butter and chocolate. (Stir constantly and make sure not to overheat; the chocolate will get lumpy and it can be hard to work with or cannot be used at all). Once melted, remove from heat and stir in the sugar and vanilla. Add eggs beating well between each one. Add flour and salt and stir until well combined. Pour the brownie batter evenly into the prepared pan.
3. Bake in the oven for 25 minutes. A tooth pick inserted into the center of the brownies should come out clean.
4. Let the brownies completely cool.
5. Mint Layer: Beat all the ingredients until smooth in your electric mixer. Add a few drops of food coloring. The frosting should be thin enough to spread, add more milk if it's too thick.
6. Spread evenly over the completely cooled brownies. Put in fridge for about 10 minutes to harden up or let stand until cool. (I added chopped andes mints to the freshly poured mint layer and then let it harden).
7. Chocolate Glaze: Just like the brownies, melt the chocolate and butter. The recipe says to spread over the brownies, however I thought there was enough chocolate. (gasp, i know!). So, i just drizzled the chocolate on top!
8. Remove brownies from pan, cut and serve!