Thursday, June 30, 2011

Oreo Brownies

I have been on the hunt for a good Oreo brownie recipe and I think this has been the first to pass the test. I have tried a couple in the past few months, but none of them made it to my blog, but this one is worth a try. You will not be disappointed!

Oreo Brownies
1 Box of Brownie Mix
1 package of Oreos (use reduced fat if you want to)
1 80z tub of cool whip (I used lite)
8oz of cream cheese (I used 1/3 less fat)
2 cups powdered sugar
1.5 cups semi-sweet chocolate
1 Tabl vegetable oil

Almost all of the ingredients! Do you like my mickey mouse measuring cups? I got them at Disney World! Love them!

1. Chop up all the oreos into groups of three. I cut them into fourths. I only used two rows of oreos, not all three.
2. Bake the brownies according the package directions. Let cool completely.
(Now, the directions actually say to fold in 1/3 of the oreos into the batter. I didn't do this because in the last batch of oreo brownies I made you couldn't even taste them. So, why the extra calories?!)

3. In your mixer combine the cream cheese and powdered sugar until combined. With a spatula gently stir in 1/3 of the chopped oreos and the cool whip. Spread on top of the brownies.
4. Now melt the chocolate chips and vegetable oil, either in a pan on the stove or the easy way, in a glass bowl in the microwave. When melted, spread evenly over the cream cheese. (Now, after having made these I would skip this step. The chocolate gets hard and it's messy and not easy to cut or serve, but that's just me).
5. Now sprinkle the remaining chopped Oreos evenly on top of the melted chocolate.

Refrigerate for at least 30 minutes or until ready to serve.
Recommendation: Cut these after they have been in the fridge for 10-15 minutes (before the chocolate has completely hardened).


Thursday, June 9, 2011

Ribbon Cake

This is a vanilla cake with three layers of fresh, homemade raspberry filling topped off with a delicious butter cream frosting! Husband's family came over for dinner and I made this cake for dessert. I was trying a new technique and I think it turned out great!! The color is a little deceiving, this is actually closer to a Tiffany's blue!


Monday, June 6, 2011

Funfetti Birthday Cake

I made this cake for my friend's birthday! She loves funfetti, so this is it!
Funfetti cake with butter cream frosting!


Friday, June 3, 2011

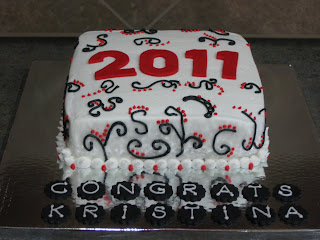
Graduation Cake

Class of 2011 Graduation Cake
Vanilla cake with a butter cream frosting and hand piped designs!


Thursday, June 2, 2011

Mini S'more Pies!

I was browsing the internet for a quick dessert for Neighbor Dinner and came across this blog and thought this sounded delicious! Oh, and it was!

Mini S'more Pies
6 Mini Graham Cracker Pie Crusts (Keebler Brand)
Marshmallow Fluff (Kraft)
2 Hershey's Chocolate Bars
Small Chocolate Pudding (not instant)
Mini Marshmallows
Mini Chocolate Chips for decoration (like this needs any more chocolate)

1. Take a spoonful (approx a tablespoon) of marshmallow fluff and put in each crust. (Warning: I tried to spread it, but it lifted the crust and broke, so take it from me and just drop it in).
2. Split the chocolate bar (I did about 3 pieces) and place on top of marshmallow fluff and press down firmly to spread out the marshmallow fluff.
3. Prepare your chocolate pudding and pour on top of chocolate bar, no need to let it cool.
4. Immediately pour mini marshmallows on top and then sprinkles with mini chocolate chips.
5. Right before you are ready to serve broil these for about a minute or two, or until the marshmallows are lightly toasted. Be careful, they burn quickly - don't take your eyes off of them!

Of course, I do not have a final picture. Are you beginning to see a pattern here?! =D

Enjoy! These little pies are yummy!